How to install Elasticsearch 6 on CentOS
In this tutorial, we will explain how to install Elasticsearch 6 on CentOS.
Elasticsearch is a search engine based on the Lucene library. It provides a distributed, multi-tenant-capable full-text search engine with an HTTP web interface and schema-free JSON documents. Elasticsearch is developed in Java. Until more recent versions, following an open-core business model, parts of the software are licensed under various open source licenses (mostly the Apache License), while other parts fall under the commercial (source-available) Elastic License.
This tutorial is now older than 2 years and may contain outdated information. There might be inaccuracies due to major changes in the software described. You should rather consider this tutorial as a general guideline that may or may not work in your specific situation.
Prerequisites
In order to follow along this tutorial, you'll need
- A VPS running CentOS with sufficient memory and CPU resources (e.g. a VPS Premium)
Step 1 – Install OpenJDK
As Elasticsearch is written in Java, we need to install a Java Runtime Environment (JRE), first. For Elasticsearch 6, we'll use OpenJDK 8. If you are connected to your server using a non-root user, you'll need to prefix the following commands with sudo to run them with elevated privileges. You can install it by running the following command:
sudo yum install java-1.8.0-openjdk.x86_64
Step 2 – Download Elasticsearch 6 RPM file
Now, you can download the Elasticsearch 6 RPM file by running this command:
wget https://artifacts.elastic.co/downloads/elasticsearch/elasticsearch-6.7.0.rpm
Step 3 – Install Elasticsearch 6
Now it's time to install Elasticsearch 6. Install it by running the rpm package manager on the downloaded file:
sudo rpm -ivh elasticsearch-6.7.0.rpm
After the installation of Elasticsearch 6 it will not be automatically started or enabled for auto-start when your server stats. To enable Elasticsearch 6 for auto-start run:
sudo systemctl enable elasticsearch.service
Afterward, proceed to start it:
systemctl start elasticsearch.service
Step 4 – Verify installation
Now you can test your Elasticsearch 6 installation by running this command:
curl -X GET "http://localhost:9200"
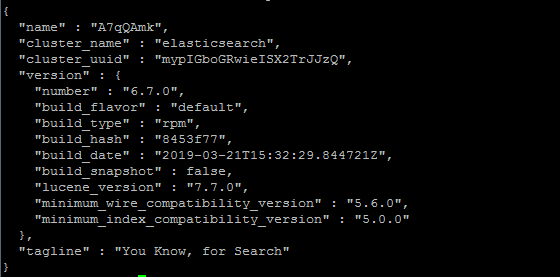
If you get a response that looks like this, your installation was successful.
Please notice that this only describes the basic installation process. You should always consider securing your Elasticsearch installation by following the official Elasticsearch security documentation.